QGIS and map sample gestion
QGIS (_g) is an open source Geographic Information Software that permits to manage a lot of different geographic data. We use it to display the drone map and to add sample points.
To do that, we have made a QGIS project with the drone map as base. The project can be joined creating a QFieldCloud account here.
To add points, we make a new vector point layer for each sampling period. For now, Two batches are available, one for the SBL.20004 curse and one for this Bachelor Work.
Connection to the QGIS project
Firstly, you have to download QGIS. Then open the software and install the QField Sync plugin under Plugins/Manage and Install Plugins/QField Sync/Install Plugin, and enter your QFieldCloud login. When it's done, you have to connect you to the project with your QFieldCloud account. Then, go in QGIS to Plugins/QFieldSync/QFieldCloud Projects Overview. Here you will normally see the project. If not, clik on the refresh button on the bottom right. When you see the DBGI project, click on it and synchronize. A new page will open, select Prefer Cloud and controll that all the ticks are under the little cloud ont the window above. Then click Perform Actions. The files are big, so it will probably take some time to download the project.
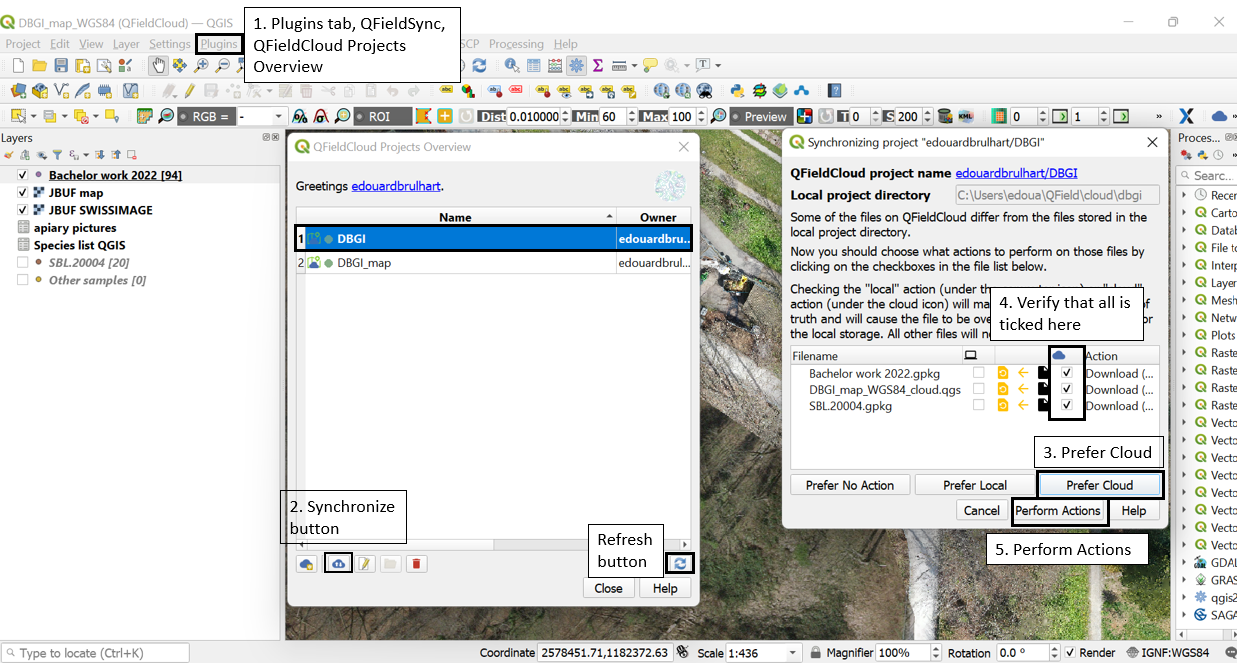 How to obtain the synchronized QGIS project
Now you have the project synced. If you want to upload changes from QGIS to the server, you can choose Prefer Local and if you want to download changes from server to QGIS, you can choose Prefer Cloud from Synchronizing project window.
Creation of a new point layer
This step has not been tested from another computer as the one who host the project. If you can't create a new layer by your own, please contact edouard.bruelhart@unifr.ch to find a solution.
Before going to sample on the field, we have to create a new layer for the harvesting :
- Right click on the Other samples layer in QGIS, Export/Save Feature As. On the Save Vector Layer as... choose the GeoPackage Format, in the File name add the layer in "C:\Users\edoua\QField\cloud\dbgi". Tick the Replace all selected raw field values by displayed values and then click OK.
- Go to Project/Properties/Relations and click Add Relation in the bottom. In the Referenced field enter Species list QGIS and select the field idTaxon. In the Referencing field entre Name of your new layer and select the field Plant_ID. Set the Relation strength to Association and then confirm by OK. Click on the bottom of Project Properties Apply and then OK.
- Right click on your new layer Properties/Attribute Form and renseign the field like in the the other samples layer, exept in Plant_ID field where you have to select the relation you created.
- Upload the changes with the QFieldSync plugin.
Utilisation on the field
1) Download the QField application. For now, only Android smartphones are available, but an IOS application seems to be in progess.
2) Open the application and login to QFieldCloud.
3) Go to QFieldCloud Projects and select the DBGI one to download on the smartphone. This step can take several minutes.
4) When the project is open, go to the left menu and select your layer. Then click on the pencil at the top right to pass in edition mode. You can now add the harvested samples by searching and selecting it in the Plant_ID. Don't forget to add the DBG sample code. All the other fields will be automatically filled. If, for any reason, the sample is not available in this field, select aaunknown parameter and fill the unknown field with the name of the sampled plant.
5) After the sample cession, reopen the left menu and click on the cloud. You just have to select Push the modifications to upload the modifications made on the server. You can then download them to the QGIS project on the computer.
6) To obtain the location data, you just have to right click on the updated layer with the points on QGIS Export/Save Feature As/CSV Format and choose the location of the CSV.